

OpenArm Setup & First Demo
Unbox, assemble, connect, and run your first teleoperation demo on OpenArm — the open-source robot arm designed for AI training data collection.
Unbox, assemble, connect, and run your first teleoperation demo on OpenArm — the open-source robot arm designed for AI training data collection. You have got this.
Beginner ⏱ 1–2 hours Updated April 2026
1. Unbox 2. Assemble 3. Install ROS2 Pkg 4. Connect 5. Visualize 6. First Command 7. Teleop 8. Record Episode 9. Next Steps
Prerequisites
- An OpenArm robot arm (available in the RCSV Store)
- Ubuntu 22.04 or 24.04 with ROS2 Humble installed (see setup guide)
- A flat, stable surface (desk or workbench)
- A USB-C cable (included in the box)
- Optional: Intel RealSense D405 wrist camera, leader arm for teleoperation
What you will accomplish
In about 1–2 hours, you will go from an unopened box to a fully operational robot arm, visualized in RViz2, responding to commands, and recording its first teleoperation demonstration with LeRobot. Everything you need is in the box (plus the software from this tutorial).
1
What is in the Box
Open your OpenArm package and verify all components are present. Here is what you should find:
OpenArm Components
⚙
Arm Assembly
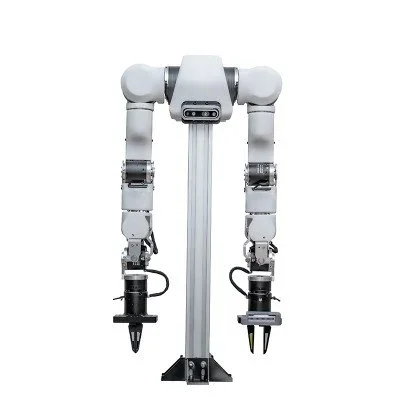
Pre-assembled 6-DOF arm with Dynamixel XM430 servos
x1
■
Base Plate
Aluminum mounting plate with rubber feet
x1
⚡
Power Supply
12V 5A DC adapter with barrel connector
x1
↻
USB-C Cable
1.5m USB-C to USB-A data cable
x1
◎
Wrist Camera Mount
3D-printed mount for RealSense D405 or webcam
x1
🔧
Mounting Hardware
M4 bolts, Allen key, cable clips
x1 bag
📄
Quick Start Card
Printed card with QR code linking to this tutorial
x1
⚒
Gripper
Parallel jaw gripper, pre-attached to wrist
x1
OpenArm Specifications
| Degrees of Freedom | 6 DOF + gripper |
| Reach | 550 mm |
| Payload | 1.0 kg |
| Repeatability | ±0.1 mm |
| Servos | Dynamixel XM430-W350 |
| Connection | USB-C (USB 2.0) |
| Power | 12V DC, 48W peak |
| Weight | 3.2 kg |
| Software | ROS2, LeRobot, Python SDK |
2
Physical Assembly
OpenArm ships pre-assembled — you just need to attach the base and connect cables. This takes about 10 minutes.
- Attach base plate: Place the arm on the aluminum base plate. Align the 4 mounting holes and secure with the included M4 bolts using the Allen key. Tighten firmly — the arm should not wobble.
- Connect power: Plug the barrel connector from the 12V power supply into the port on the arm's base. Do NOT power on yet.
- Mount wrist camera (optional): Slide the camera mount onto the wrist bracket and secure with the two small screws. Attach your RealSense D405 or USB webcam to the mount.
- Route cables: Use the included cable clips to route the USB-C and camera cables along the arm. This prevents cables from snagging during operation.
- Position on desk: Place the assembled arm on a stable, flat surface with at least 60 cm of clear space around it in all directions.
Safety: Keep hands clear of the arm joints when powered. OpenArm servos are strong enough to pinch fingers. Always start with the arm in a known position (straight up) before sending commands.
3
Install OpenArm ROS2 Package
Clone the OpenArm ROS2 packages into your workspace and build them.
Copy# Make sure ROS2 is sourced source /opt/ros/humble/setup.bash # Clone OpenArm packages into your workspace cd ~/ros2_ws/src git clone https://github.com/svrc-robotics/openarm\_ros2.git # This includes: # openarm_description — URDF, meshes, RViz config # openarm_bringup — launch files for hardware # openarm_control — ros2-control config # openarm_moveit — MoveIt2 config (optional) # Install dependencies cd ~/ros2_ws rosdep install --from-paths src --ignore-src -r -y # Build colcon build --symlink-install source install/setup.bash
Starting >>> openarm_description Starting >>> openarm_control Starting >>> openarm_bringup Finished <<< openarm_description [2.1s] Finished <<< openarm_control [3.4s] Finished <<< openarm_bringup [2.8s] Summary: 3 packages finished [4.2s]
4
Connect via USB-C
Connect OpenArm to your computer with the USB-C cable and set up permissions.
Copy# Connect USB-C cable and power on the arm # The servos will briefly flash their LEDs # Check that the device is detected ls /dev/ttyUSB* # Expected output: /dev/ttyUSB0
Set up a udev rule so you do not need sudo every time:
Copy# Create udev rule for Dynamixel USB adapter sudo bash -c 'cat > /etc/udev/rules.d/99-openarm.rules << EOF # OpenArm — Dynamixel U2D2 USB adapter SUBSYSTEM=="tty", ATTRS{idVendor}=="0403", ATTRS{idProduct}=="6014", MODE="0666", SYMLINK+="openarm" EOF' # Reload udev rules sudo udevadm control --reload-rules sudo udevadm trigger # Verify — you should now see /dev/openarm as a symlink ls -la /dev/openarm
Copy# Quick connectivity test — ping all servos ros2 run openarm_bringup ping_servos --port=/dev/openarm # Expected output: Servo 1 (shoulder_pan): OK — firmware 46 Servo 2 (shoulder_lift): OK — firmware 46 Servo 3 (elbow): OK — firmware 46 Servo 4 (wrist_pitch): OK — firmware 46 Servo 5 (wrist_roll): OK — firmware 46 Servo 6 (gripper): OK — firmware 46 All 6 servos responding.
All 6 servos responding? You are connected and ready. If any servo is missing, check the daisy-chain cable between servos — gently reseat the connectors on the non-responding servo and its neighbor.
5
Launch RViz2 Visualization
See your arm in 3D by launching the robot description and RViz2.
Copy# Launch robot_state_publisher + RViz2 visualization ros2 launch openarm_description display.launch.py
RViz2 opens with the OpenArm URDF model displayed. You should see:
- The arm model rendered in the 3D viewport
- Joint state publisher GUI sliders on the side
- The arm updating in real-time as you move the sliders
If you have the arm connected, launch with hardware feedback instead:
Copy# Launch with live hardware feedback (arm must be connected) ros2 launch openarm_bringup openarm.launch.py \ port:=/dev/openarm \ rviz:=true
Now physically move the arm gently (with power off or in torque-disabled mode) and watch the RViz2 model follow your movements in real time.
6
Run First Joint Position Command
Send your first command to the arm. We will move it to a safe "home" position.
Copy# Make sure the bringup is running in another terminal: # ros2 launch openarm_bringup openarm.launch.py port:=/dev/openarm # Send arm to home position (all joints at 0) ros2 topic pub --once /target_joint_positions sensor_msgs/msg/JointState \ "{position: [0.0, 0.0, 0.0, 0.0, 0.0, 0.5]}"
The arm should smoothly move to the upright home position with the gripper half-open.
Copy# Try a different pose — reach forward ros2 topic pub --once /target_joint_positions sensor_msgs/msg/JointState \ "{position: [0.0, -0.5, 0.8, -0.3, 0.0, 0.5]}" # Close the gripper ros2 topic pub --once /target_joint_positions sensor_msgs/msg/JointState \ "{position: [0.0, -0.5, 0.8, -0.3, 0.0, 0.0]}" # Open the gripper ros2 topic pub --once /target_joint_positions sensor_msgs/msg/JointState \ "{position: [0.0, -0.5, 0.8, -0.3, 0.0, 1.0]}"
Safety: Start with small joint angle changes. Large sudden movements can cause the arm to collide with the table or itself. The safe range for shoulder_lift (joint 2) is roughly -1.0 to 0.5 radians when the arm is on a desk.
7
Set Up Teleoperation
Now let us control the arm interactively. You can use keyboard control (simplest) or a leader arm (best for data collection).
Option A: Keyboard Teleoperation
Copy# Launch keyboard teleop node ros2 run openarm_bringup keyboard_teleop --port=/dev/openarm # Controls: # W/S — shoulder lift up/down # A/D — base rotate left/right # Q/E — elbow flex/extend # R/F — wrist pitch up/down # Z/X — wrist roll left/right # O/C — gripper open/close # Space — stop all movement # H — return to home position
Option B: Leader Arm Teleoperation (recommended for data collection)
Copy# Connect leader arm to second USB port ls /dev/ttyUSB* # Should show /dev/ttyUSB0 (follower) and /dev/ttyUSB1 (leader) # Launch leader-follower teleoperation ros2 launch openarm_bringup teleop.launch.py \ follower_port:=/dev/ttyUSB0 \ leader_port:=/dev/ttyUSB1
With leader-follower mode, physically moving the leader arm causes the follower arm to mirror your movements in real time. This is the best way to collect high-quality demonstration data.
Feel the response: The follower arm should track your leader movements with minimal delay (<50ms). If there is noticeable lag, check that both arms are on separate USB buses (not a shared hub) and reduce the control rate from 500 Hz to 200 Hz.
8
Record First LeRobot Episode
Time to record your first demonstration. Set up a simple task (e.g., pick up a small object) and record it with LeRobot.
Copy# Activate LeRobot environment source /lerobot_env/bin/activate # Record a single episode lerobot record \ --robot-type=openarm \ --port=/dev/openarm \ --leader-port=/dev/ttyUSB1 \ --fps=30 \ --task="pick_object" \ --num-episodes=1 \ --output-dir=/datasets/openarm_first_demo # Press Enter to start recording # Perform the task with the leader arm # Press Enter to stop recording
Recording episode 1/1... Press Enter to START recording. [Recording] Frame 0... 30... 60... 90... Press Enter to STOP recording. Episode 1 saved: 127 frames (4.2s) at 30fps Dataset saved to ~/datasets/openarm_first_demo/
Verify your recording:
Copy# Visualize the recorded episode lerobot visualize-dataset \ --dataset-path=~/datasets/openarm_first_demo \ --episode=0
Congratulations — your first episode is recorded.
You have gone from an unopened box to a working robot arm that records teleoperation demonstrations. That is the hardest part done. From here, everything is about scaling up: more episodes, more tasks, better policies.
9
Next Steps
Your OpenArm is set up and recording. Here is your learning path from here:
- Record 50 episodes of a pick-and-place task following the LeRobot quickstart guide
- Train your first ACT policy and watch the arm perform the task autonomously
- Scale to 300+ episodes for VLA fine-tuning using the data collection tutorial
- Fine-tune OpenVLA on your data with the VLA fine-tuning guide
Need another OpenArm?
Building a multi-arm setup or outfitting a lab? RCSV offers volume pricing and custom configurations for research teams.
Troubleshooting
No /dev/ttyUSB device found
Check that the USB-C cable is firmly connected at both ends. Try a different USB port. Run dmesg | tail to see if the device was detected by the kernel. If you see "FTDI" in the output, the device is recognized but may need the ftdi_sio driver: sudo modprobe ftdi_sio.
Servo not responding in ping test
Check the daisy-chain cable between the non-responding servo and its neighbor. Reseat both connectors. If a single servo is unresponsive, its ID may have been reset — use the Dynamixel Wizard to scan and reassign IDs.
Arm moves to wrong position
The calibration may be off. Re-run ros2 run openarm_bringup ping_servos --port=/dev/openarm to verify all servo IDs match the expected configuration. Check that the URDF joint limits match your physical arm.
RViz2 shows arm in wrong orientation
Make sure you sourced the workspace: source ~/ros2_ws/install/setup.bash. The URDF may not be found if the workspace is not sourced. Also verify the fixed frame in RViz2 is set to base_link.
Leader arm teleoperation has high latency
Ensure both arms are on separate USB controllers (not a shared hub). Reduce the control rate: add control_rate:=200 to the launch command. Check CPU usage — close unnecessary applications. On laptops, make sure you are plugged in (power saving throttles USB).
Related Tutorials
[
LeRobot Quickstart
Record 50 demos and train your first policy — the natural next step after this tutorial.
](/tutorials/lerobot-quickstart)[
Collect Robot Training Data
Scale up to production data collection with RLDS format and quality scoring.
](/tutorials/collect-robot-training-data)[
ROS2 Setup Guide
Full ROS2 installation guide if you have not set up your environment yet.
](/tutorials/ros2-setup-guide)
Frequently Asked Questions
What is OpenArm and who is it for?
OpenArm is an open-source 6-DOF robot arm designed specifically for AI training data collection. It features a built-in wrist camera mount, leader-follower support for teleoperation, and native LeRobot integration. It is built for researchers, labs, and teams collecting manipulation data for robot learning.
What are the OpenArm specifications?
OpenArm has 6 degrees of freedom, a 550mm reach, 1 kg payload capacity, 0.1 mm repeatability, and Dynamixel XM430 servos. It connects via USB-C, weighs 3.2 kg, and draws 48W at peak. The wrist camera mount accepts Intel RealSense D405 or USB webcams.
Do I need ROS2 to use OpenArm?
ROS2 is recommended for the full feature set (RViz visualization, MoveIt2 planning, ros2-control hardware interface). However, OpenArm also works directly with LeRobot's Python API without ROS2 — you can record demonstrations and train policies using just LeRobot.
Can I use OpenArm with LeRobot?
Yes, OpenArm has native LeRobot support. It is listed as a supported robot in the LeRobot hardware library and comes pre-configured with the correct YAML settings. You can start recording demonstrations immediately after physical setup.
Where can I buy OpenArm?
OpenArm is available in the RCSV Store at roboticscenter.ai/store. It ships in 3–5 business days within the US. International shipping is available. The arm comes fully assembled with all cables, power supply, and a quick-start guide.
Was this tutorial helpful?
👍 Yes 👎 No
Stay Ahead in Robotics
Get the latest on robot deployments, data collection, and physical AI — delivered to your inbox.